Guest Post- Finding Your Community of Moms

I was honored when Amber at Grace Filled Life of Mom and Wife asked me to write a guest post for her blog! She has written some beautiful posts about motherhood, faith, and family. I hope you’ll read my post and also take some time to read hers!

You can find Amber on Facebook,  Twitter, and WordPress!

Finding Your Community of Moms

Finding Your Community of Moms- Champagne and Cheerios

Money-Making Apps

Apps I’ve personally used and made money with!

Money-Making Apps- Champagne and Cheerios

I don’t know about you, but I love saving money. I get a weird sort of high when I know I’ve scored an awesome deal. Most of the times those great deals are found in a physical store, sometimes online. And then there are my apps. I use apps to save money while shopping and to make a little extra cash on the side. While the dollar amounts I earn each time are small, they can add up very quickly! Between all my apps I’ve made $100 in a year just using my smartphone!

Below I’ve listed my favorite money-saving and money-making apps. All of them are free, legit, and available in both the Apple App Store and te Google Play Store.  Check them out!

Rebate Apps
The premise of the rebate apps is simple but powerful- buy groceries, get rebates. I buy my groceries as normal, then look through the apps to see if there are any rebates available for the items I purchased. I scan the barcode on the items and then take a picture of my receipt. Done!

Ibotta
Checkout 51
Snap by Groupon


Receipt Scanning Apps
These apps give you points (to redeem for gift cards) or cash (PayPal) for taking pictures of your receipts. It’s fast and easy, especially if you scan each receipt into each app every time.

Find&Save (use my code YD5W for a sign-up bonus)
Receipt Hog (Use my code troh7606 for a sign-up bonus)
Receipt Pal


Money-Saving Apps
These apps help me find the best deals both in-store and online!

Key Ring– This app stores all my discount and membership card barcodes for easy access and savings/points every time I shop. It’s so much easier to use this app than to flip through all of my cards each time, especially since I have about 75 of them! I added my husband to my account so that he can use the same cards when he is out and about, too, which racks up even more points and saves even more money!

Snip Snap Coupon App– This app is a  great place to find coupons. Users take pictures of their coupons and upload them to the app for everyone to use. I’ve had great luck with this app and find myself using it more on the fly than in a premeditated sort of way. Example- I’m at Pier 1 and check to see if there are any Pier 1 coupons on the site. If there are, I add it to my coupons, show it to the cashier, it’s scanned, cha-ching!

CartwheelTarget has a special place in my heart. I love shopping there, and if the Target in my city sold groceries I don’t think I’d have to shop anywhere else, honestly. This app has revolutionize how I save money at Target. Offers are displayed in the app, I add them to by list, and have the cashier scan my barcode at check out. I also make sure to scan each item’s tag before I checkout to make sure I’m not missing an extra discount. Combined with my RedCard debit card, coupons, and sales I save hundreds of dollars at Target this way!


Two Unusual Teething Solutions That Never Fail!

While there’s nothing wrong with frozen teething rings, they just don’t always seem to do the trick. My daughter would maybe chew on them for a minute or two, but then drop them and walk away, still in pain from her growing teeth.

Two Teething Solitions That Never Fail-  Champagne and Cheerios
The two teething solutions that I will share with you today are not the typical ones that everyone shares when you express your teething woes. However, I can guarantee that they will work, that you can feel good about using them, and that your child will get immediate relief! I know all this because I’ve used them myself on a weekly, if not almost daily, basis.

The The first method I’ll share with you is one that my daughter particularly enjoyed when she was younger. Now that she’s a little bit older, this one doesn’t seem to help as much, but it can do the trick in a pinch.

I’m sure you’ve heard of the old frozen washcloth trick, but have you heard of soaking that same washcloth and tea instead of water? That’s right! Instead of soaking my washcloth in plain old water, I soak 4-5 of them in organic chamomile tea. I then fold the washcloths into quarters, just my preference, and place them in the freezer on a cookie sheet lined with parchment or wax paper. I make a bunch at one time so I don’t waste the tea and so that I have some on hand whenever I need one. The coldness of the washcloth helps bring down the inflammation of her sore gums and the chamomile tea soothes.

I was skeptical at first, but when I gave my daughter the first chamomile washcloth she chewed on it until it was slightly thawed and wet and then started sucking the tea out. She felt so much better and when back to playing instead of fussing about her teeth!

The second method that I’ll share with you is one that my daughter really loves and that always works! Two words: frozen yogurt. No, not the kind with all the toppings that you get at the mall! I freeze tubes of organic yogurt, Cut them in half, and give one to my daughter as a snack, especially when she’s teething.

This is our absolute favorite way to help our daughter cope with teething. She loves the snack and the coldness, I love that the yogurt has nutrition that she needs and enjoy it. It’s a win for everyone!


Two Unusual Teething Solutions That Never Fail- Champagne and Cheerios

A face full of yogurt makes for a happy baby!


(Disclaimer: Please do not give yogurt, especially frozen yogurt, to babies who are not yet eating solids {or anything besides breast milk and/or formula}. The World Health Organization recommends that babies no younger than six months of age eat solid foods. Please check with your pediatrician if you have any concerns or are unsure about dairy allergies or any allergies to the fruits that might be in the yogurt you choose.)


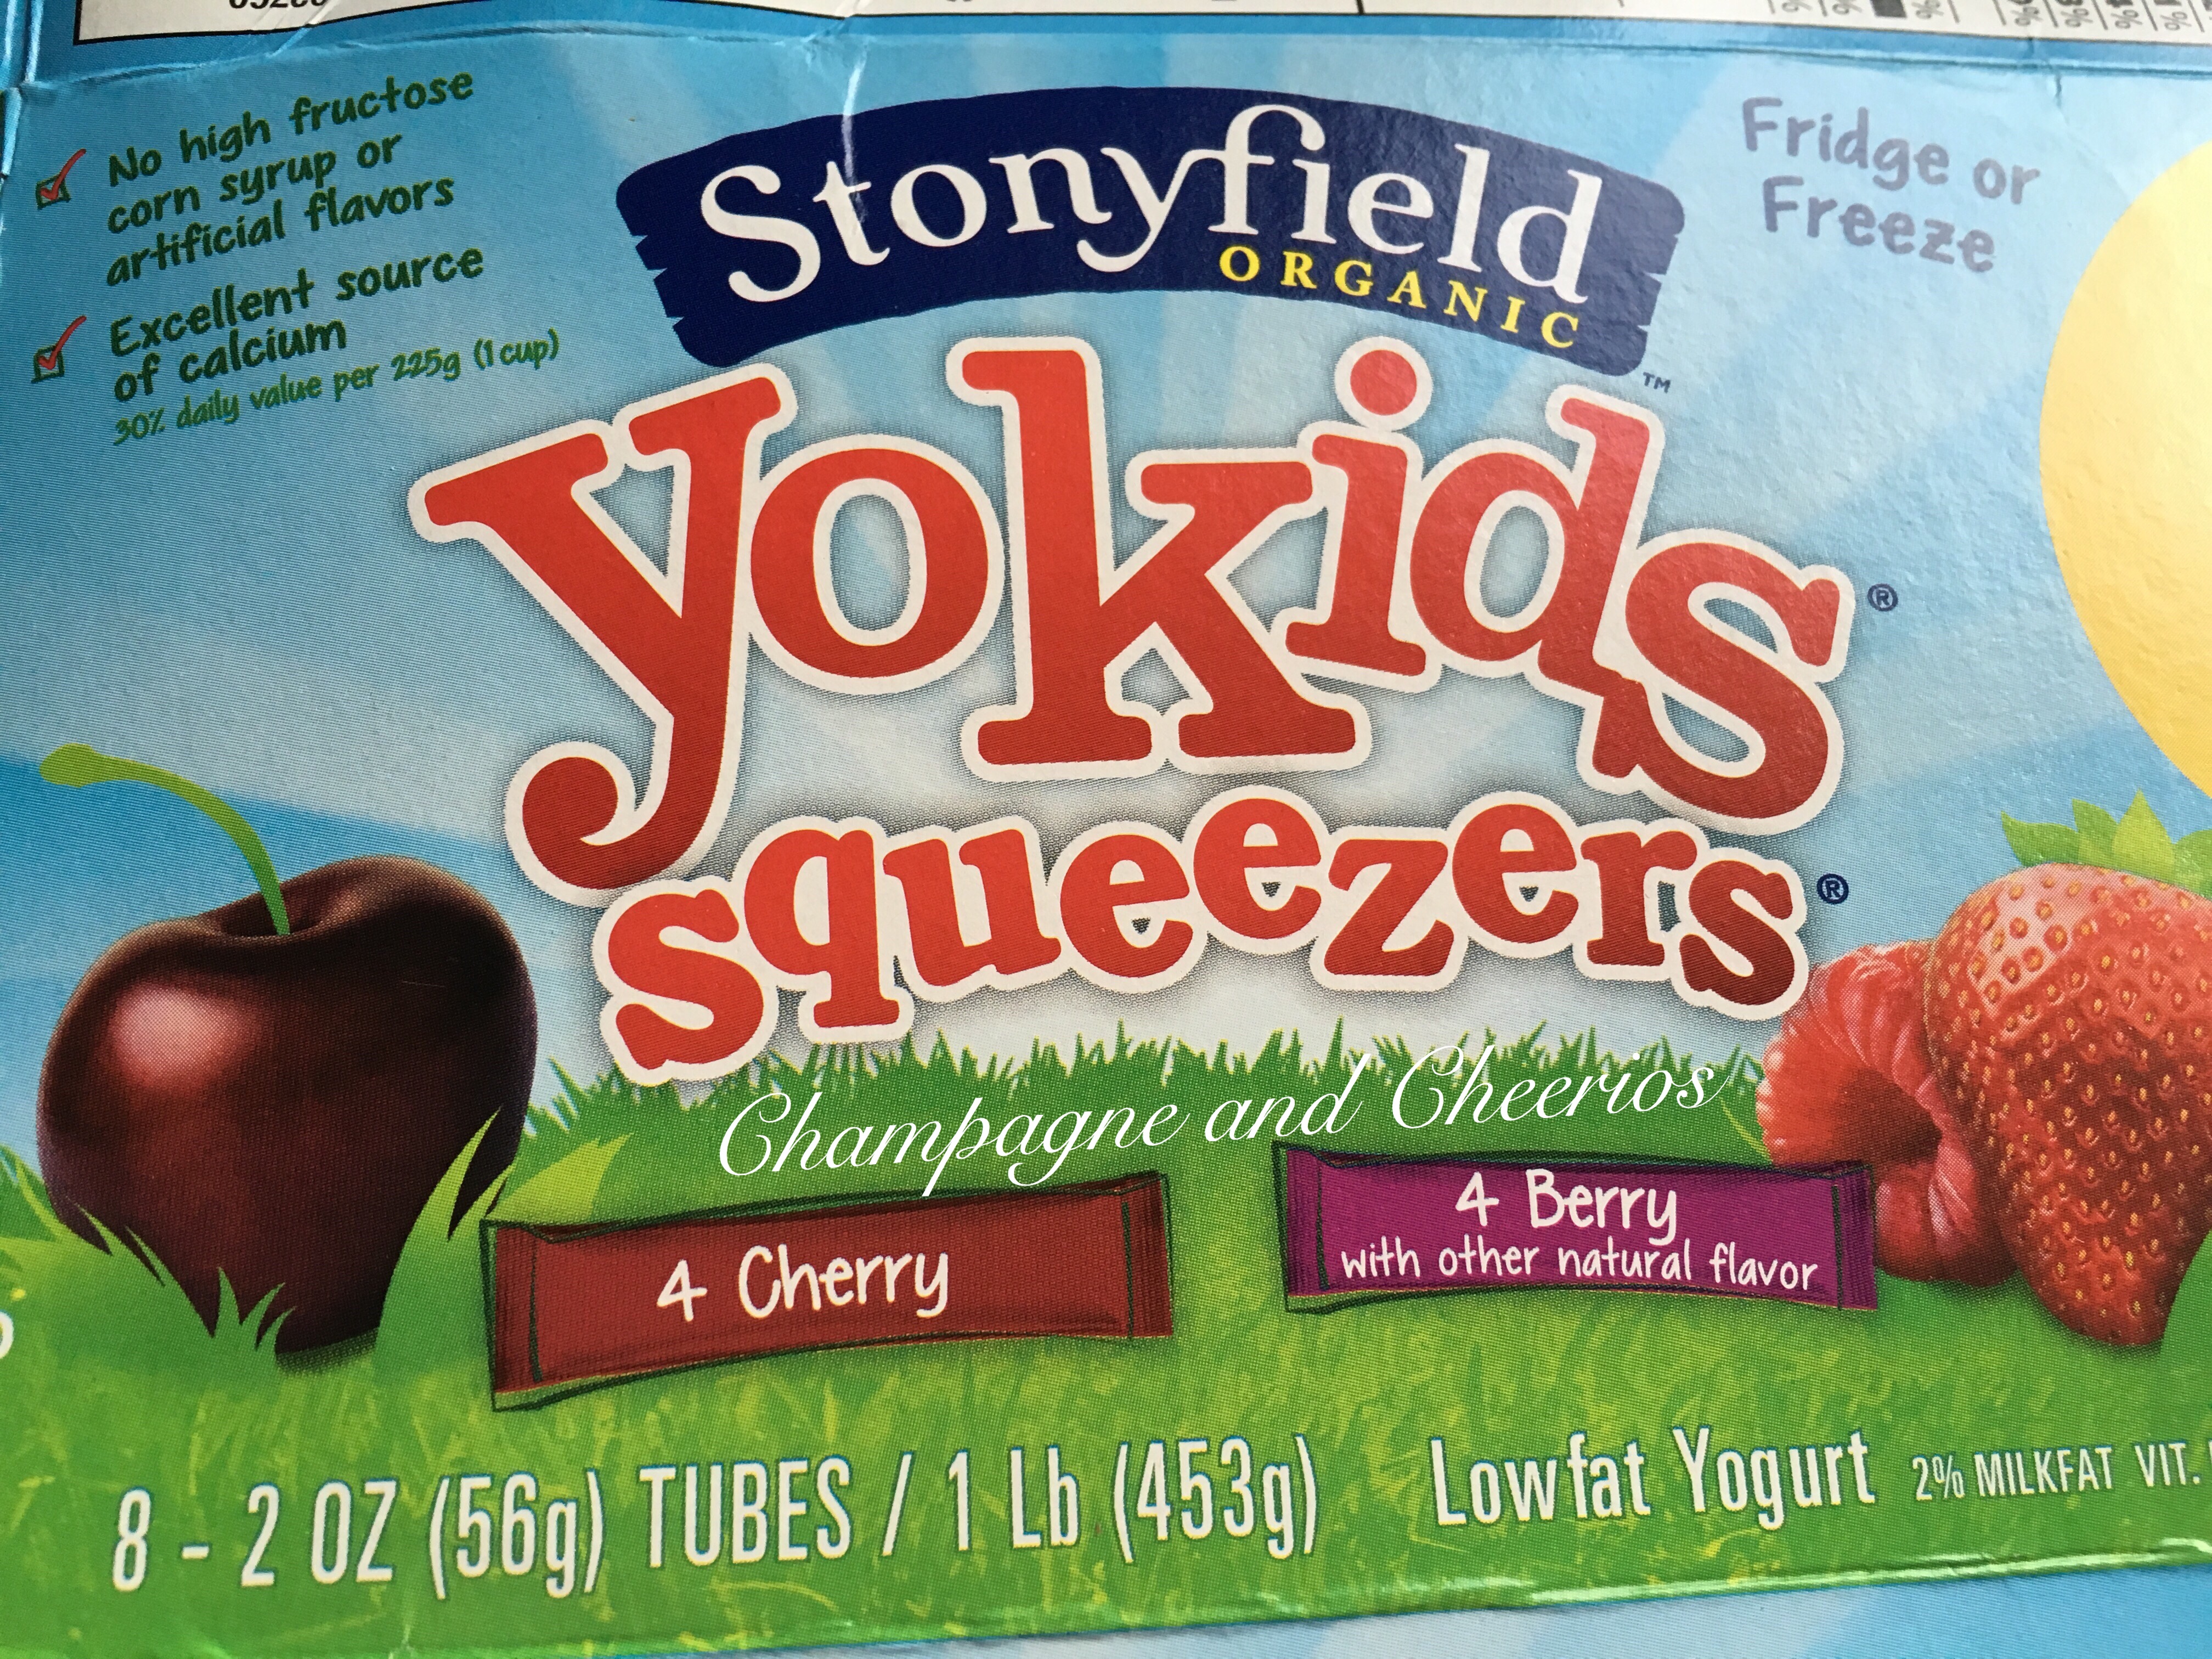
Here are some pictures to illustrate how I prepare the frozen yogurt:

1. Buy your favorite yogurt. Stonyfield is our go-to brand.

Two Unusual Teething Solutions That Never Fail- Champagne and Cheerios
2. Freeze the yogurt tubes.

Two Unusual Teething Solutions That Never Fail- Champagne and Cheerios

3. Cut each tube in half. (A whole tube is a little too much yogurt for my daughter, and it gets way too messy as the yogurt thaws!)

Two Unusual Teething Solutions That Never Fail- Champagne and Cheerios

4. Store the yogurt in a freezer-safe bag and serve very cold.

Two Unusual Teething Solutions That Never Fail- Champagne and Cheerios
So there you have it! My two favorite, no fail teething solutions!

What are your favorite solutions? Share below!

To the Weary Mom This Christmas Eve,

 To the Weary Mom on Christmas Eve 

It’s Christmas Eve and I feel weary. Do you feel weary, momma? As moms the burden often falls on us to make Christmas special for our family, our children, and even our friends. Is it really supposed to be that way, though? I take joy in providing wonderful Christmas experiences and memories for my daughter, but sometimes I get so wrapped up in the decorating, the buying, the wrapping, and the traveling that I forget to take time for silent nights and even a little rocking around the Christmas tree. (Do you see what I did there?) 

I don’t have all the answers, and I’ll never do it all correctly, but let me encourage you on this Christmas  Eve, Mommy- take time to dance and sing with those babies, they’ll never be this small again. Eat a cookie, marvel at Christmas lights, and capture those precious memories- they’re so fleeting. 

Merry Christmas! I hope that the time spent with your family brings you closer to each other and to Christ, whose birth we celebrate! 

-Brittany

A Tip on Cooking with Fresh Garlic

 A Tip on Cooking with Garlic- Champagne and Cheerios 
Here’s a great tip for when you’re working with fresh garlic cloves- see that stem looking thing on the left? If you remove it and chop and cook what remains your garlic will taste smooth and creamy and won’t have that almost spicy bite that is sometimes associated with garlic.
Follow these easy steps! 
1) Crush garlic clove with the flat part of your knife using the palm of your hand. Make sure to keep those fingers up and out of the way! 

 A Tip on Cooking with Garlic- Champagne and Cheerios 
2) Remove any of the papery casing and the center green piece. (Sometimes it’s large, and sometimes it’s small; but it’s always there!) 

 A Tip on Cooking with Garlic- Champagne and Cheerios 
 A Tip on Cooking with Garlic- Champagne and Cheerios 
3) Chop away and use in your favorite dishes! 

Did you try it? How did your dish turn out? 

How I Stopped Using Paper Towels

How I Stopped Using Paper Towels- Champagne and Cheerios

Today I’ll start with a few math problems:

19.98 x 3 = 59.94

19.99 x 4 = 79.96

Those are the best case scenarios of what I was paying for paper towels in a year. The first one is Sam’s Club. Not working in the cost of a standard membership, on average I was buying 3 packages of 25 paper towels a year. Assuming I paid the regular price for them I spent $59.94 for a year’s worth of paper towels.

Now let’s say you don’t have a Sam’s membership and instead you go to Target where the “value sized” package of the same paper towels I would buy at Sam’s has 20 rolls and costs $19.99 a piece. In this case you would buy 4 packages a year (this is just an example!) making your yearly budget for paper towels about $79.96. WOAH! I don’t know about you, but I can think of a lot more things I’d like to spend almost $80 on besides paper towels; so I did something about it!

About a year ago I started using cloth napkins instead of paper towels at meal times. Just doing this reduced the amount of paper towels we went through big time! It brought me down to about 2 big (Sam’s Club) packages a year. I started off with 12 plain white napkins from Target’s Threshold brand. I bought white because I wanted to be able to bleach them if they started getting really stained. After a couple months I bought some really cute patterned napkins to use when guests come over so they don’t have to see my (stained) everyday napkins! Ever since I’ve been buying up cute cloth napkins when I go to garage sales. While it’s fun to have lots of cute napkins, for our family of 2 (+ a baby) 12 seems to work just fine most of the time.

A few weeks ago I decided to jump into this no paper towel thing with both feet- I put the paper towel roll under the sink in a cabinet and in its place I put a basket of these white wash cloths from Target. My husband thought I was crazy. He said, “What are we going to use to wipe up the counter and the floor?” I replied “The washcloths!” He was skeptical, but you know what- it’s been 3 weeks and we don’t miss them at all! I use paper towels for two things now- cleaning the windows and mirrors with Windex and for sopping up grease when I fry food. In three weeks we haven’t even gone through one roll! That’s amazing!!!! The washcloths cost $3.49 for a package of 8. I wash them with clothes or with towels, whatever laundry I happen to be doing that day and 8 seems to be ok. I might go back and get another package just to make sure I don’t run out on days that I’m behind on laundry.

How I Stopped Using Paper Towels- Champagne and Cheerios

And that’s it! That’s how I stopped using paper towels! I love using the cloths- it’s so easy and I can genuinely say that I won’t be going back to using paper towels!

Have you given up paper towels? How are you liking it? For those of you who haven’t, do you think this is something you could do?

The links in this post contain affiliate links and I will receive a small commission if you make a purchase after clicking on my link.

Jalapeño Cheese Bread Recipe

I will now share with you one of my most requested recipes. That’s really saying something, seeing as how a friend shared this recipe with me about 3 years ago! This is a fantastic appetizer to serve for guests, or just to make for your family when you’re wanting something delicious before dinner. The recipe calls for a specific seasoning made by my friend JoJo at Only Herbs Gourmet Seasonings. While I’ve made this recipe without the seasoning when visiting family, I must say it is significantly better with the seasoning! With Small Business Saturday coming up it’s the perfect time to head over to her website and order some for you and maybe even some for gifts! This seasoning is delicious on anything you can think to put it on!

Jalapeño Cheese Bread


Ok, enough talk, time for the recipe!

Prepare the pizza crust according to the instructions on the package. Preheat the oven to the specified temperature. Spread the crust onto a greased baking sheet or stone. Prick the crust all over to prevent bubbles.

Jalapeño Cheese Bread

Sprinkle the crust with Only Herbs Original Seasoning, then sprinkle Mexican Blend cheese all over crust.

Only Herbs Gourmet Seasonings


Jalapeno Cheese Bread Add Seasonings

Jalapeno Cheese Bread Add Cheese

Place sliced jalapeños all over crust- as many as you want!

Jalapeno Cheese Bread Add Jalapenos

Top with a little bit more cheese and Only Herbs Original Seasoning.

Jalapeno Cheese Bread More Cheese and Seasoning

Bake for about 12 minutes, slice, and serve hot!

Jalapeno Cheese Bread Baked

Seriously, just look at this! If you’re mouth isn’t watering, go see your doctor!

Jalapeño Cheese Bread

I guarantee this appetizer will be a hit at your next gathering! If you make it, comment below and let me know what you thought of the recipe! Enjoy!

Jalapeño Cheese Bread

Ingredients

1 package of pizza crust mix (any brand)

1-2 cups of Mexican blend cheese (to taste)

2-5 Tbsp. pickled jalapeño slices (to taste)

1-3 tsp Only Herbs Original Blend Seasoning (to taste)

Directions

  1. Prepare the pizza crust according to the instructions on the package. Preheat the oven to the specified temperature.
  2. Spread the crust onto a greased baking sheet or stone. Prick the crust all over to prevent bubbles.
  3. Sprinkle the crust with Only Herbs Original Seasoning, then sprinkle Mexican Blend cheese all over crust.
  4. Place sliced jalapeños all over crust- as many as you want!
  5. Top with a little bit more cheese and Only Herbs Original Seasoning.
  6. Bake for about 12 minutes, slice, and serve hot!


Why my kitchen is always clean!

Nope, I didn’t get a maid! By doing this ONE easy thing every day my kitchen is always clean! Wanna know what it is?! Drum roll please…… I wipe everything down at least once a day.

Why my kitchen always looks so clean and why you don't need to hate me for it!

I can hear you- “What? That’s it? How does that keep her kitchen clean? It’s just wiping…” I’ll tell you why- because wiping is just the action that you can see. What you can’t see is what makes it possible for that one action to keep my kitchen so clean. I have ZERO clutter in my kitchen. I am the queen of baskets, bins, and keeping everything as out of sight as possible. My kitchen counters are home to only the essentials and one or two decorations to give it some homeyness. When I wipe down my kitchen I pick up everything that actually lives on the counter and wipe under it. Every. Single. Time. If i had a bunch of stuff all over my counters this would be impossible! I also wipe down all the surfaces of my appliances, both large and small, and the window sills. This doesn’t really take as long as you would think. Because everything gets wiped down at least once a day there’s not a lot of grime to scrub off, just maybe some light dust and whatever I was cooking with.

Here’s what the process looks like:
1. I cook. (See my recipes for some ideas there!)
2. I do the dishes. (Actually, a lot of the time Hubby does them. What?! Yeah, he’s awesome.)
3. After cleaning the sink I wring out the soapy rag so that it’s damp, but not super wet. I then start at one end of the counter and start wiping. Usually that’s the end with the stove. I make sure to wipe down the stove top, oven door, knobs, and microwave door. (If I used the microwave and things spattered in there I will wipe that down too.)
4. Next I wipe down the counter on the other side of the oven and the sink area. I make sure to get the handles and the faucet.
5. After that it’s pretty much all counter space at this point. I pick up the fruit basket, coffee maker, cookie jar (which actually houses my coffee filters), and all the decorations and wipe under them as I go. I also make sure to wipe off the toaster oven, coffee maker, jar, and window sill.

And that’s it! It’s that simple- just wipe everything down! If you can keep your counter space clutter free it’s that much easier and will have such a huge impact in making your home look clean!

Try it for one week and tell me what you think!

Recipe- Pickled Jalapeños

Over the last few years I have really developed a taste for jalapeños! I never really liked them until I tried my friend Jo Jo’s Jalapeño Cheese Bread and then I was obsessed! I love them on everything now- chicken, taquitos, pizza! When they go on sale, you can get jalapeños pretty cheap (Much cheaper than if you bought a jar of them in the olive and pickle section!) so why not pickle your own?! I think you’ll find the process to be very easy, cost effective, and delicious!


Homemade PickledJalapeños

Ingredients:
8-12 whole jalapeños (tops removed and discarded)
2 cloves garlic
1 cup distilled or filtered water
1 cup distilled white vinegar
4 tbs white sugar
2 tbs kosher salt

First, after rinsing off your jalapeños, cut off the tops and throw them away. Next, slice up your jalapeños and put them aside.  (NOTE: I scraped all the seeds off my cutting board with my knife and put every last one in the bowl because I wanted a little more heat and flavor. If you don’t like as much heat you don’t have to do this.

dsc_0482

Can we just take a moment and bask in the BEAUTY of these jalapeños! *Sigh*

dsc_0484

In a medium-sized pot combine water, vinegar, garlic, sugar, and salt. Bring the mixture to a boil.

dsc_0486

Once boiling, add the jalapeños. Stir and press the jalapeños down into the mixture. I used a ladle for this, it was just easier, plus you’ll be using the ladle later (less dish washing!!)

dsc_0490

When the mixture again begins to boil, remove it from the heat and allow it to sit for at 10-15 minutes.

Ladle your jalapeños (and the garlic cloves) into your sterilized jar and pour in your liquid mixture until the jar is full. Seal the jar tightly and allow it to come to room temperature. Once it has reached room temperature put it in the fridge! Easy!!

dsc_0495

Now look at this: My jar contains $1 worth of jalapeños- 16 oz. The jar I bought at the store last week costs $2.33 and is only 12 oz. I stink at math, but it’s clear to me that this is WAY cheaper! And as if that isn’t enough, you get the satisfaction of knowing exactly what is going into your body and you get to say you canned these yourself every time you serve them to your friends. Let’s also note that their jar says “fresh pack,” however those had to be picked, sliced and canned by a machine, packaged, labled, shipped, and stocked at the grocery store before I even bought them. My jalapeños were picked from the farm and put in a jar in my own kitchen in less than a week! It doesn’t get much better than that!

dsc_0499

Stay tuned, a recipe for Jalapeño Cheese Bread will be coming soon and you don’t want to miss out!

How to Clean Your Stove’s Drip Pans

How to Clean Your Drip Pans-- Champagne and Cheerios

One word described my drip pans- gross! I consider myself a very clean and tidy person, but my stove’s drip pans were just plain nasty. I finally decided enough is enough and cleaned those things and I’m going to show you just how I did it!

Before and After

DISCLAIMER: I’ll be completely honest with you- I want to say that this was super easy and you can have them shiny and beautiful in no time but that just wasn’t true for me. Maybe it was because everything was really, really, really cooked on there, who knows, but the point is this was not as easy as I thought it was going to be. Worth it! But not a quick fix. For me, at least! I hope that this doesn’t discourage you from trying it, I just want to be honest up front so you don’t come back and yell at me if you have to use a little more elbow grease than you expected!

Here are the steps!

  1.  Remove the burners and drip pans from the stove and placed them on the counter top.Dirty drip pans on counter
  2. Place each drip pan in it’s own zip-top plastic bag. Then add 1/3 cup of ammonia to each bag and zip up right away!Drip pans in bags with ammonia
  3. Here’s the easiest step- Let your pans stay in the bags for 24 hours. Don’t worry about moving them around in the bags or anything, just let the fumes do what they do best!
  4. Here’s the stinky part! After 24 hours have passed put on your rubber gloves and remove the drip pans from their bags. I did this one at a time, cleaning one before moving onto the next one. With a plastic bristled brush, followed by a soapy rag or sponge, scrub off the grime. Depending on how clean your pans get you may or may not be able to stop at this step. Mine looked like this, so I kept going.Drip pans not yet clean
  5. In a bowl combine baking soda and water to create a paste. Using a rag, scoop some of the paste onto your drip pans and scrub, scrub, scrub! This took me quite a lot of time and elbow grease. I hope yours are not as baked on as mine were! There were some spots that were so hard neither the baking soda paste nor my fingernails could get them off.  I resorted to a table knife. I don’t know if I would recommend doing so, as it scratched my pans, but I was desperate and tired. If you don’t care about a few scratches then go for it.Scratches on drip pan
  6. Give them one more wash with a soapy rag or sponge, dry them off, and you’re done! Marvel at the under appreciated beauty that is clean drip pans!Clean drip pans!

BONUS CLEANING TIP! Did you know that your stove does this?! I didn’t until the handyman at an old apartment complex showed me a few years ago! I love how easy it is to clean under the drip pans now! While you’ve got your pans in the ammonia go ahead and give this a try. It’s so quick and easy!

Cooktop